
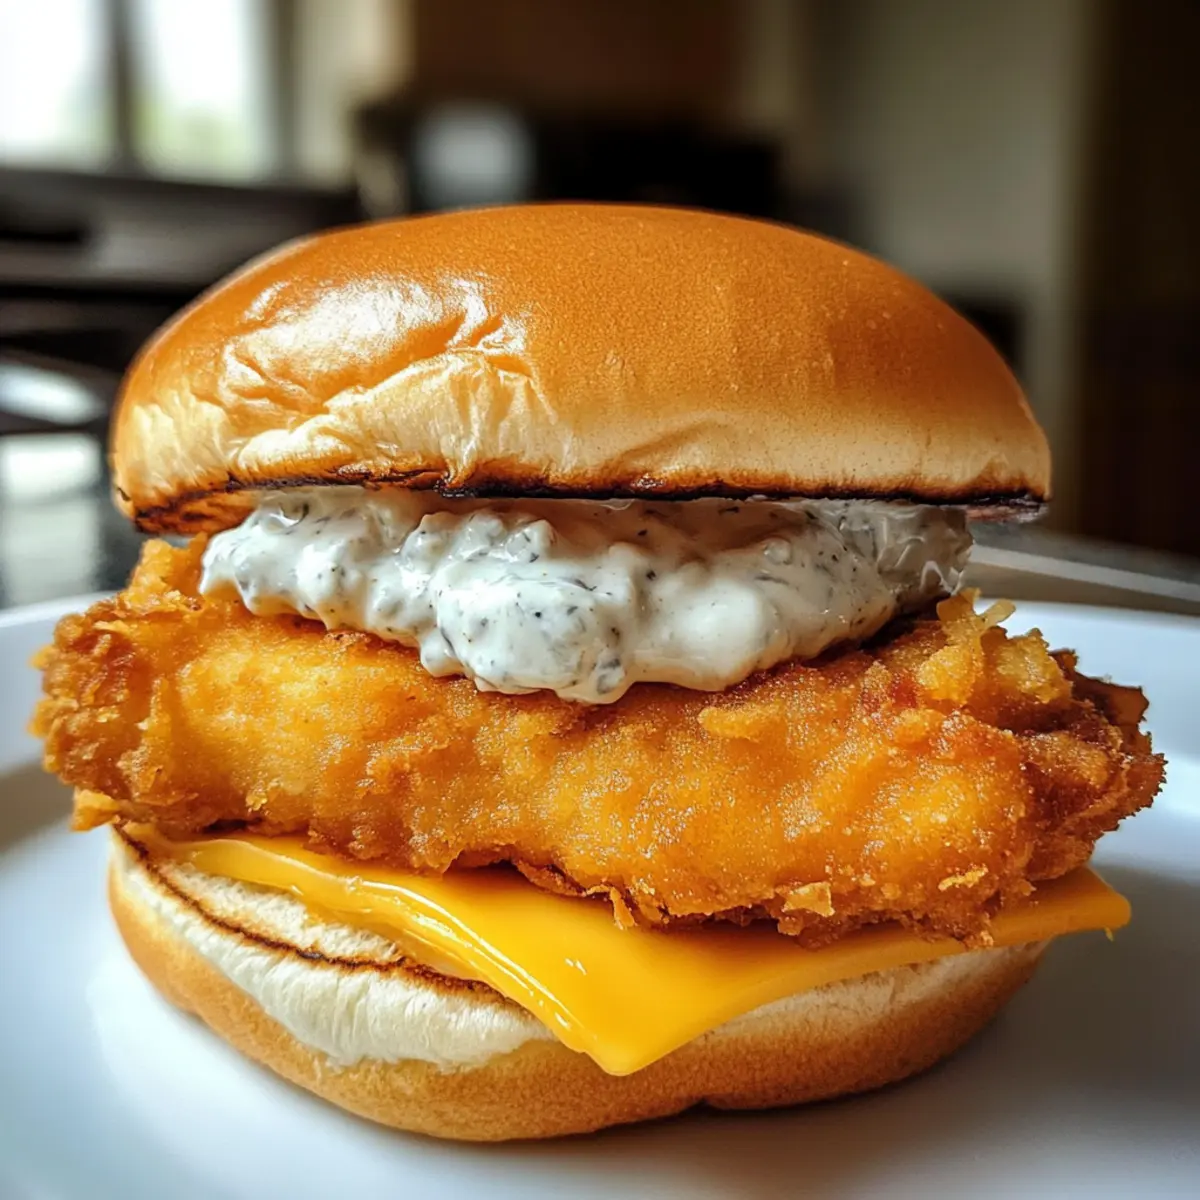
As the crisp golden-brown exterior of the Fried Cod Fish Sandwich sizzles in the hot oil, I can’t help but feel a rush of excitement. This delightful twist on the beloved Filet-O-Fish brings the joy of homemade cooking right to your table. Imagine sinking your teeth into a tender, flaky filet of deep-fried Icelandic cod, slathered with a zesty homemade tartar sauce and topped with gooey American cheese—all nestled in a fluffy steamed bun. This classic American comfort food not only delivers a wholesome alternative to fast food, but it’s also a quick prep that’s perfect for weeknight dinners or even special occasions. Why run to the drive-thru when you can create this satisfying treat in your own kitchen? Ready to indulge in some delicious nostalgia? Let’s dive in!

Why is this sandwich a must-try?
Crispy Perfection: The golden-brown exterior gives your taste buds a satisfying crunch with every bite.
Homemade Flavor: Enjoy the richness of zesty tartar sauce made from scratch, perfectly complementing the cod.
Versatile Options: Experiment with different fish or add your favorite spices for flavor variations that suit your palate.
Quick Preparation: Whip this up in about 30 minutes, making it an ideal choice for busy weeknights or casual gatherings.
Crowd-Pleasing: Serve with Crispy Oven Baked Fries or a fresh salad for a delightful meal that everyone will love!
Fried Cod Fish Sandwich Ingredients
For the Fish
• Cod – This is the star of the show, giving a flaky and tender texture; can be substituted with Alaskan pollock or haddock if preferred.
• Salt & Pepper – Essential for enhancing the flavor; don’t be shy, season liberally!
• Peanut Oil – Ideal for frying due to its neutral flavor; feel free to use another neutral oil like canola if you desire.
• Flour – Forms the crispy dredge; be sure to divide it into dry and wet for the best coating effect.
• Old Bay Seasoning – Adds a uniquely savory seafood flavor; if unavailable, a homemade blend or celery salt works too.
• Paprika – Provides color and a mild sweetness to the dredge.
• Turmeric – While it adds a lovely hue, it can be omitted if desired.
• White Pepper – Offers a gentle hint of heat without overpowering the dish.
• Baking Powder – Helps the batter rise, resulting in extra crunch; remember to measure it as stated in the recipe.
• Egg – Acts as a binder for the wet dredge, ensuring adhesion.
• Sparkling Water – Helps create a light and airy batter; a light beer is a delightful alternative!
For the Sandwich
• Hamburger Buns – The classic base for your sandwich; steaming them briefly gives a soft and pillowy texture.
• Cheddar Cheese – Adds a creamy layer of flavor; using American cheese will give it that authentic touch!
For the Tartar Sauce
• Mayonnaise – Forms the creamy base of the tartar sauce that makes this sandwich special.
• Dill Pickles – Their crunchy texture and tanginess are must-have ingredients for the tartar sauce.
• Capers – Provide a burst of briny goodness that elevates your homemade tartar.
• Fresh Parsley – Adds a touch of freshness and color to the sauce.
• Lemon Juice – The zesty acidity balances the richness of the mayo and enhances flavors.
• Dijon Mustard – Offers a delightful kick that brings the tartar sauce to life.
• Salt & Pepper – To taste, seasoning the tartar sauce just right is key for perfect balance.
There you have it—a collection of essential ingredients for your Fried Cod Fish Sandwich! Get ready to create a delicious homemade meal that’s sure to impress!
Step‑by‑Step Instructions for Fried Cod Fish Sandwich
Step 1: Heat the Oil
Begin by pouring peanut oil into a heavy-bottomed skillet or deep fryer, filling it to about 2 inches deep. Heat the oil over medium-high heat until it reaches 375°F, using a candy thermometer for accuracy. This high temperature is crucial for achieving a crispy Fried Cod Fish Sandwich.
Step 2: Prepare the Tartar Sauce
While the oil heats, mix together mayonnaise, Dijon mustard, lemon juice, diced dill pickles, capers, and chopped fresh parsley in a bowl. Season with salt and pepper to taste, ensuring the flavors are beautifully balanced. Set this zesty tartar sauce aside to allow the flavors to meld while you focus on the fish.
Step 3: Prepare the Fish
Cut the cod into 4-6 oz portions and season both sides generously with salt and pepper. Place the seasoned cod on a wire rack to allow any excess moisture to drip off. This step ensures a crispier coating and helps the fish maintain its flaky texture in your Fried Cod Fish Sandwich.
Step 4: Create the Dredges
In two separate bowls, prepare the dry dredge by mixing flour with Old Bay seasoning and other spices. In the second bowl, combine flour with additional Old Bay, baking powder, egg, and sparkling water to create a light batter. The contrasting textures of the dry and wet dredges are key to the ultimate crunch in your sandwich.
Step 5: Dredge the Fish
Take each seasoned piece of cod and first coat it in the dry dredge, making sure it is fully covered. Next, dip the fish into the wet dredge, allowing any excess batter to drip off. This thorough coating is what gives your Fried Cod Fish Sandwich its iconic crispy exterior.
Step 6: Fry the Fish
Carefully lower the dredged fish into the hot oil, frying in batches to avoid overcrowding. Fry each piece for 2-3 minutes on each side, or until the coating turns a gorgeous golden brown. Once perfectly crisped, remove the cod with a slotted spoon and place on a wire rack to drain any excess oil.
Step 7: Steam the Buns
While frying, prepare your hamburger buns by placing them in a steamer or covered pot for a few minutes until warm and soft. Steaming helps achieve the perfect texture that complements the crispy fish and creamy tartar sauce in your Fried Cod Fish Sandwich.
Step 8: Assemble the Sandwich
To assemble your tasty Fried Cod Fish Sandwich, spread a generous layer of tartar sauce on the bottom bun. Place the fried cod on top, followed by a slice of cheddar cheese to enhance the flavor. Add more tartar sauce on top of the cheese, and finish with the top bun, sealing in all the deliciousness.

How to Store and Freeze Fried Cod Fish Sandwich
Fridge: Store leftover sandwiches without the bun in an airtight container for up to 2 days. For best results, keep the fish separate to maintain crispiness.
Freezer: Wrap individual portions of cooked cod tightly in plastic wrap and aluminum foil, then place in a freezer-safe container. Freeze for up to 3 months.
Reheating: To reheat the fish, place it in a preheated oven at 375°F for about 10-15 minutes until hot and crispy. Avoid microwaving, as this can make the fish soggy.
Bun Storage: If you’ve prepared extra buns, store them in a resealable bag at room temperature for up to 2 days or freeze for up to 3 months. Reheat in a steamer before serving.
Fried Cod Fish Sandwich Variations
Feel free to get creative with your Fried Cod Fish Sandwich by exploring these tempting variations that will add a personal touch to your meal.
-
Gluten-Free: Swap the flour with gluten-free all-purpose flour or almond flour for a deliciously crispy coating without the gluten. You won’t miss a thing with this tasty twist!
-
Dairy-Free: Use dairy-free cheese options like cashew cheese or vegan slices to keep your sandwich creamy and satisfying without dairy. It’s a great choice for those with lactose intolerance!
-
Spicy Kick: Add a few dashes of your favorite hot sauce or cayenne pepper into the dredge or the tartar sauce for a flavor that packs a punch. Experience a whole new level of flavor!
-
Smoky Flavor: Incorporate smoked paprika in place of regular paprika to add a deep, complex flavor to your batter that compliments the fish beautifully. Your taste buds will thank you for this delicious upgrade!
-
Asian-inspired: Try swapping tartar sauce for a sriracha mayo or spicy kimchi for a zingy fusion twist. Serve it on a bao bun for an exciting touch that’s sure to impress!
-
Herbed Twist: Mix fresh herbs like dill, basil, or tarragon into the tartar sauce for an aromatic herbaceous flavor that elevates the classic sandwich to gourmet status. A fresh take for those who love bold flavors!
-
Add Crunch: Top your sandwich with a handful of coleslaw or fried onion strings for an added crunch and texture that adds an irresistible bite. Both add a fresh, delightful contrast to the crispy fish.
Don’t forget to try pairing your Fried Cod Fish Sandwich with some Crispy Oven Baked Fries or even an easy side of Air Fried Eggplant to round out your delicious homemade meal!
What to Serve with Crispy Fried Cod Fish Sandwich
Imagine sinking your teeth into crispy fried goodness while savoring a warm, comforting meal that feels like a hug on a plate.
-
Crispy Oven Baked Fries: The classic pairing with a crunch that complements the sandwich’s texture perfectly; their salty, golden exterior is simply irresistible.
-
Fresh House Salad: A light, refreshing mix of greens that cuts through the richness of the fish sandwich; toss in cherry tomatoes and cucumbers for extra zing.
-
Coleslaw: Creamy and tangy, this crunchy side balances the flavors of the sandwich, making each bite feel refreshing and delightful.
-
Pickled Vegetables: Their acidity cuts through the richness, offering a tangy contrast that enhances the dish’s overall flavor profile.
-
Corn on the Cob: Sweet and buttery corn provides a summery touch, adding a satisfying sweetness that pairs wondrously with the savory sandwich.
-
Lemonade: A tall glass of homemade lemonade brings a refreshing zing that invigorates the palate alongside the crispy fried cod fish sandwich.
-
Soft Serve Ice Cream: Finish your meal on a sweet note with a scoop of soft serve; its creaminess contrasts beautifully with the crunch of the sandwich.
Make Ahead Options
These Fried Cod Fish Sandwiches are a fantastic choice for busy home cooks looking to save time during the week! You can prepare the tartar sauce up to 3 days in advance; simply mix together the mayonnaise, Dijon mustard, lemon juice, pickles, capers, and parsley, then store it in an airtight container in the refrigerator. For the fish, you can cut and season the cod pieces and refrigerate them for up to 24 hours prior to frying. When you’re ready to serve, dredge the cod and fry it fresh for that all-important crispiness. This way, you’ll have restaurant-quality sandwiches with minimal effort on those hectic weeknights!
Tips for the Best Fried Cod Fish Sandwich
-
Maintain Oil Temperature: Frying at a consistent 375°F ensures crispy fish without sogginess. Use a thermometer for accurate readings.
-
Don’t Overcrowd: Fry in small batches to maintain oil temperature. Overcrowding can lead to steaming rather than frying, compromising texture.
-
Proper Dredging Technique: Fully coat the fish in the dry dredge first, then the wet dredge, to achieve that iconic, crunchy exterior for your Fried Cod Fish Sandwich.
-
Quality Ingredients Matter: Fresh cod and homemade tartar sauce elevate the flavor significantly. Invest in good ingredients for the best outcome.
-
Rest After Frying: Place fried fish on a wire rack to drain excess oil, ensuring each bite remains crispy before assembling the sandwich.

Fried Cod Fish Sandwich Recipe FAQs
What type of cod should I use for the Fried Cod Fish Sandwich?
Absolutely! While Icelandic cod is the star of this recipe, you can easily substitute it with Alaskan pollock, haddock, or even halibut for a different flavor and texture. Just ensure the fish is fresh and of good quality for the best results in your sandwich.
How should I store leftover Fried Cod Fish Sandwich?
Very good question! Store any leftover sandwiches without the bun in an airtight container in the fridge for up to 2 days. Keep the fish separate from the bun to retain its crispy texture. Just reheat the fish in a preheated oven at 375°F for about 10-15 minutes to make it nice and crunchy again!
Can I freeze the Fried Cod Fish Sandwich?
Absolutely! To freeze the fish, wrap individual portions of the cooked cod tightly in plastic wrap, then in aluminum foil, and place them in a freezer-safe container. This way, they will keep for up to 3 months. When you’re ready to enjoy your sandwich again, simply reheat the fish in an oven for a crispy texture!
What if my batter isn’t sticking well to the fish?
If you find that your batter isn’t adhering properly, try patting the fish dry with a paper towel before dredging it. Moisture can prevent the batter from forming a good bond. Also, make sure you’re generously coating the fish in both the dry and wet dredges. A thorough coating will ensure that crispy outer layer you’re craving!
Is this recipe suitable for those with allergies?
If you have allergies, this recipe can be adjusted! However, do keep in mind that it uses common allergens like wheat (in flour) and egg. Consider using gluten-free flour and a suitable egg substitute if needed. Always read labels carefully to avoid cross-contamination, and if you’re cooking for someone with severe allergies, it’s best to consult with them first.
How long can I keep the tartar sauce?
You can store any leftover homemade tartar sauce in an airtight container in the refrigerator for up to 3 days. Just give it a good stir before using to refresh the flavors. This zesty sauce is so good, you might just want to double the recipe for future use!
Fried Cod Fish Sandwich: A Crispy Homemade Delight
Ingredients
Equipment
Method
- Heat the peanut oil in a heavy-bottomed skillet or deep fryer over medium-high heat until it reaches 375°F.
- Prepare the tartar sauce by mixing mayonnaise, Dijon mustard, lemon juice, diced dill pickles, capers, and fresh parsley. Season with salt and pepper.
- Cut the cod into 4-6 oz portions, season with salt and pepper, and place on a wire rack.
- Create the dry dredge by mixing flour with Old Bay seasoning. For the wet dredge, combine flour, additional Old Bay, baking powder, egg, and sparkling water.
- Dredge the fish by first coating it in the dry dredge, then dipping it in the wet dredge.
- Fry the dredged fish in batches for 2-3 minutes per side, or until golden brown, and drain on a wire rack.
- Steam the hamburger buns until warm and soft.
- Assemble the sandwich with tartar sauce, fried cod, cheddar cheese, and top bun.
Leave a Reply