
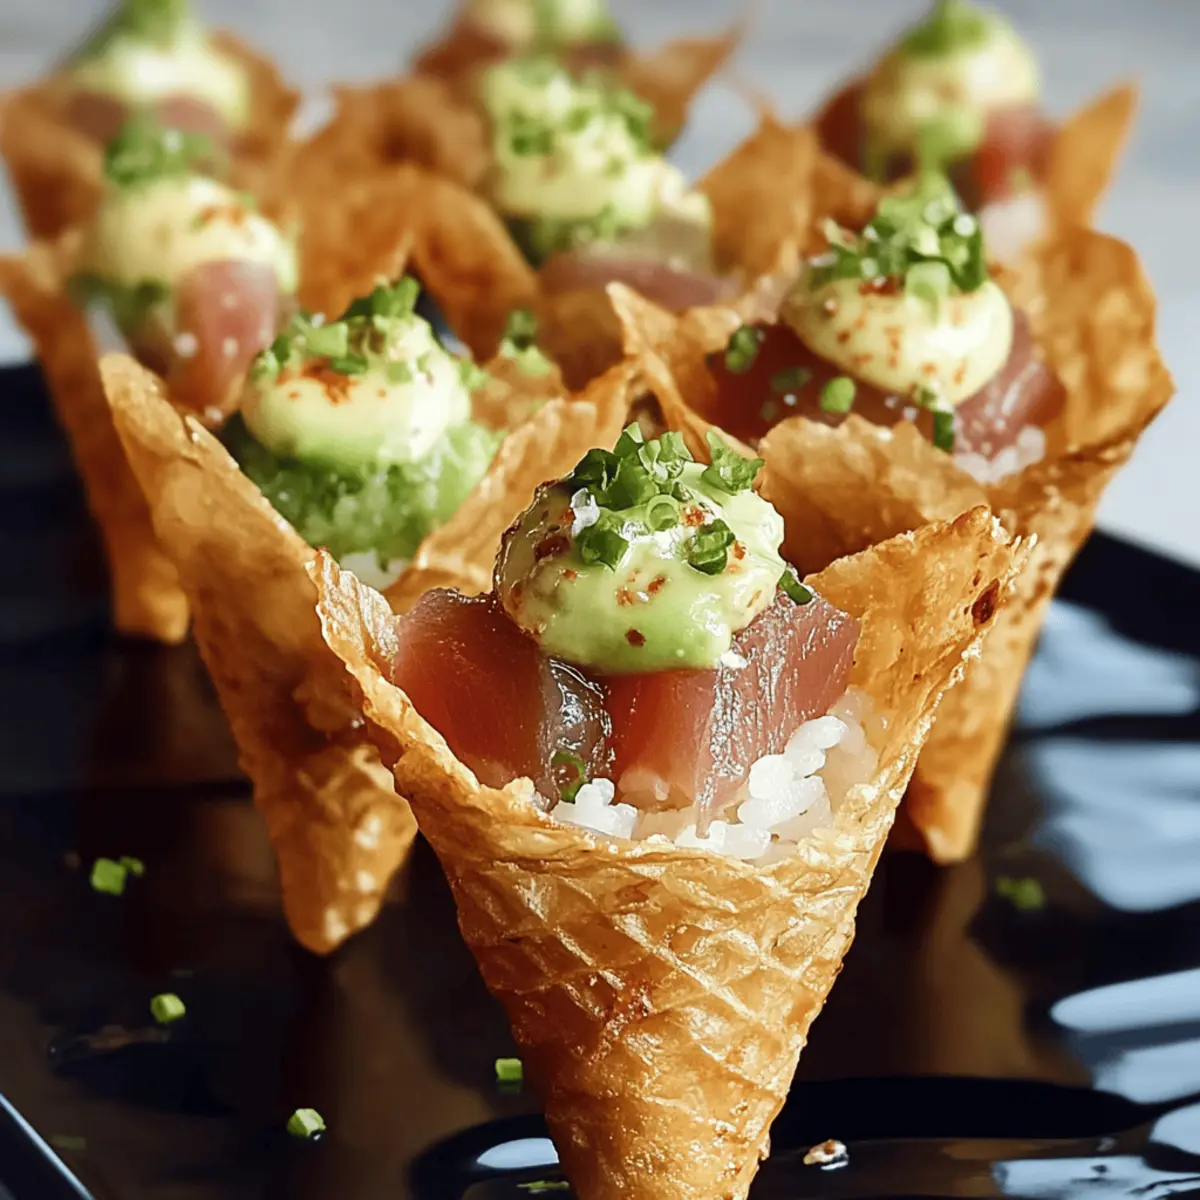
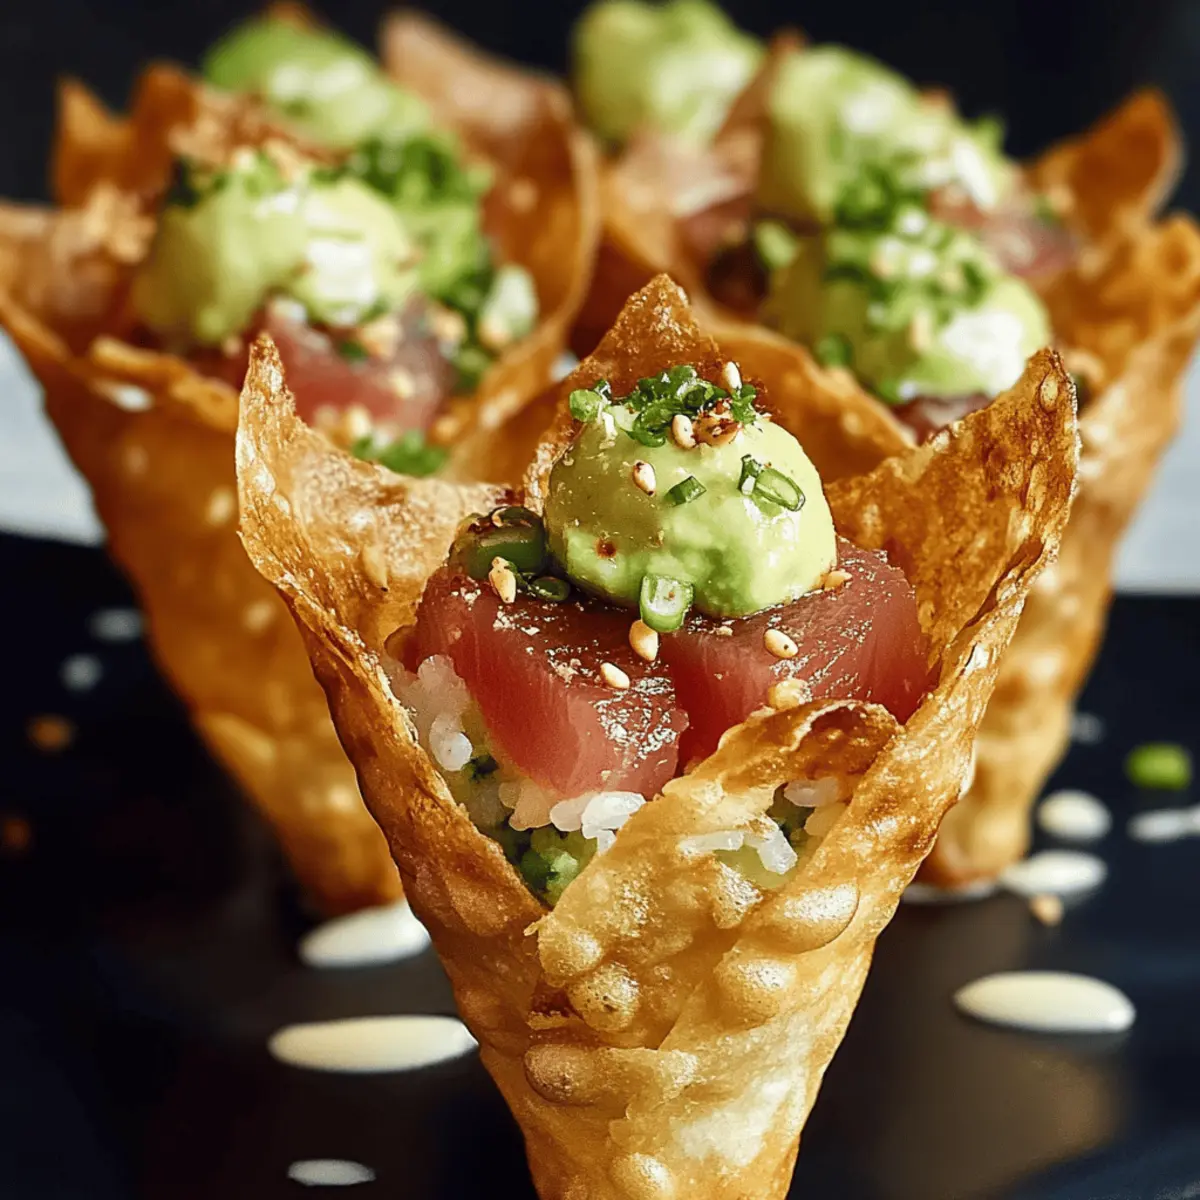
In a whirl of culinary creativity, I recently found myself embracing a playful twist on traditional sushi. Enter the wondrous world of Creative Sushi Wonton Cones! This fun and interactive appetizer combines the crispy delight of wonton wrappers with the fresh flavors of sushi fillings, making it a hit at any gathering. These delightful cones are not only quick to prepare but are also fully customizable, allowing you to switch up ingredients based on your cravings—seafood, vegetarian, or anything in between. Perfect for parties or a cozy night in, each bite offers a satisfying crunch paired with creamy avocado and tender sushi rice, making your taste buds dance with joy. So — are you ready to dive into the deliciousness of these fabulous sushi cones?

Why Are Sushi Wonton Cones So Unique?
Creative, these Sushi Wonton Cones make for a fun and engaging dining experience! Quick to prepare, they’ll have you and your guests munching in no time. Customizable fillings mean you can cater to all taste preferences, whether you prefer seafood or vegetarian options. Elegant presentation makes them a showstopper at any gathering, from casual parties to festive celebrations. Plus, if you’re a fan of playful eats, you might also love trying out Strawberry Shortcake Sushi for an unexpected sweet twist! Enjoy the delightful crunch combined with creamy interiors that will elevate your next meal!
Creative Sushi Wonton Cone Ingredients
For the Wontons
• Wonton wrappers – These provide the perfect structure for your cones; substitute with spring roll wrappers for a unique texture.
• Coconut oil – Ideal for frying, delivering a beautifully crispy finish; vegetable oil can also be used as an alternative.
For the Sushi Rice
• Sushi rice (short-grain, sticky) – This is your base ingredient for texture; brown rice can be used for a whole grain option.
• Rice vinegar – Enhances the flavor of the sushi rice; white vinegar works in a pinch if needed.
• Sugar – Balances the acidity of the vinegar in the rice; optional if you’re looking to reduce sweetness.
• Salt – A critical flavor enhancer; feel free to adjust based on your taste preference.
For the Filling
• Avocado – Adds a creamy richness; cucumbers can be substituted for a lighter touch.
• Tuna steak (sushi-grade) – Offers high-quality protein; you can swap this out for salmon or cooked shrimp.
• Kewpie mayonnaise – This gives your tuna mixture a creamy component; use regular mayo or Greek yogurt for a lighter version.
• Tomato ketchup or sauce – Adds a touch of sweetness; adjust according to your taste.
• Sriracha (optional) – Infuses some heat into the tuna mixture; omit or reduce if you prefer less spice.
• Lime zest – Brightens up the overall flavors; lemon zest can work as a substitute when limes are out of season.
• Furikake or black sesame seeds – These bring an extra layer of flavor and a gorgeous garnish; optional but highly recommended for additional texture.
Additionally, these Creative Sushi Wonton Cones allow for endless variations, so feel free to explore and create your own signature combination!
Step‑by‑Step Instructions for Creative Sushi Wonton Cones
Step 1: Prep Wontons
Begin by preheating your oven to 175 °C (350 °F). Gently wrap each wonton wrapper around a cream horn or cone mold, ensuring to press and seal the edges tightly to prevent any opening during frying. Arrange the wrapped wontons on a baking sheet while you prepare the oil for frying.
Step 2: Fry
Heat a deep skillet over medium-high heat and add enough coconut oil to submerge the wonton cones, approximately 2-3 inches deep. When the oil reaches 175 °C (350 °F), carefully add the wontons in small batches, frying them for about 2-3 minutes until golden brown and crispy. Use a slotted spoon to remove them, and allow them to drain on paper towels.
Step 3: Prepare Sushi Rice
While the wontons are cooling, cook 1 cup of sushi rice according to package instructions. Once cooked, transfer the rice to a large bowl and immediately mix in rice vinegar, sugar, and salt while the rice is still warm. Gently fold in these ingredients, allowing the rice to cool to room temperature, enhancing the flavor as you prep the filling.
Step 4: Make Filling
In a separate bowl, flake the sushi-grade tuna using a fork until it is nicely shredded. Mix the tuna with Kewpie mayonnaise, a splash of tomato ketchup, optional sriracha for heat, and some lime zest for freshness. Stir until well combined, tasting and adjusting the seasonings according to your preference for this flavorful filling.
Step 5: Assemble
Once your wonton cones are cooled, it’s time for assembly! Take each crispy cone and fill it with a layer of your seasoned sushi rice, followed by a few slices of creamy avocado, and finally, spoon in the tuna mixture generously. Layer ingredients like this for a delightful combination of flavors and textures in each Creative Sushi Wonton Cone.
Step 6: Garnish
To finish off your Creative Sushi Wonton Cones, sprinkle a touch of furikake or black sesame seeds on top of the assembled cones. This delightful garnish adds extra flavor and visual appeal. Serve the cones immediately for the best texture, and consider placing them upright in mini muffin tins to showcase their gorgeous, crispy shape.
Creative Sushi Wonton Cone Variations
Feel free to play around with these suggestions to make your Creative Sushi Wonton Cones truly your own! Each variation adds a unique twist that will tantalize your taste buds.
-
Spicy Tuna:
Add more sriracha to your filling for a fiery kick. You can even mix in diced jalapeños for added heat! -
Vegetarian Delight:
Replace tuna with a mix of diced tofu and crunchy vegetables like bell peppers and carrots for a satisfying meat-free option. -
Seafood Medley:
Combine shrimp and crab in your filling along with a touch of lime juice. This blend brings a delightful oceanic freshness to your cones. -
Creamy Avocado:
For a richer filling, mash avocado and mix it with Greek yogurt. This combo creates a creamy yet healthier alternative to traditional mayo. -
Crispy Tempura:
Incorporate tempura-battered vegetables like sweet potato or zucchini for a delightful change in texture that adds crunch! -
Asian-Inspired Slaw:
Mix together shredded cabbage, carrots, and a dash of sesame oil to create a fresh slaw that can be nestled inside your sushi cones for a refreshing contrast. -
Dipping Sauce Lovers:
Experiment with a variety of dipping sauces. Try a soy-wasabi blend or a spicy peanut sauce to elevate your dining experience.
And if you’re feeling adventurous, why not explore something sweet next? These delightful cones could even inspire a dessert version—just like my delightful Strawberry Shortcake Sushi! Customize away, and make these cones a canvas for your culinary creativity!
Make Ahead Options
These Creative Sushi Wonton Cones are perfect for meal prep enthusiasts looking to save time on busy weeknights! You can prepare the sushi rice and the tuna filling up to 24 hours in advance. Simply store the cooled sushi rice in an airtight container in the refrigerator, and do the same for the tuna mixture to maintain freshness. When you’re ready to serve, fry the wonton wrappers and assemble the cones with layers of sushi rice, avocado, and tuna right before enjoying. Keeping the components separate ensures that your cones preserve their delightful crunch and prevent the avocado from browning. This way, you’ll have restaurant-quality sushi cones ready to go with minimal effort!
Expert Tips for Creative Sushi Wonton Cones
-
Perfect Oil Temperature: Maintain the frying oil temperature at 175 °C (350 °F) to ensure crispy, non-greasy cones. Too hot can make them brittle, while too cool can result in sogginess.
-
Cooling Sushi Rice: Allow your sushi rice to cool to room temperature after seasoning; this maximizes flavor absorption and prevents the filling from becoming overly warm.
-
Separation is Key: Keep avocado and any assembled cones separate until serving to retain the creaminess of the avocado and the crispiness of the wonton.
-
Moderate Your Fillings: While creativity is encouraged, avoid overfilling your cones. A balanced amount prevents structural integrity issues and ensures every bite has a delightful combination of flavors.
-
Explore Variations: Feel free to swap in different proteins or vegetables for your filling. Customizing your Creative Sushi Wonton Cones ensures they remain exciting and tailored to your guests’ preferences.
How to Store and Freeze Creative Sushi Wonton Cones
Fridge: Store assembled Creative Sushi Wonton Cones in an airtight container for up to 3 hours to maintain crispiness while preventing sogginess.
Freezer: Unassembled cones can be frozen for up to 1 month. Place wrapped, un-fried wontons on a baking sheet until frozen, then transfer to a zip-top bag.
Reheating: If frozen, fry directly from frozen state without thawing for 3-4 minutes until golden brown. For refrigerated cones, reheat in a preheated oven at 175°C (350°F) for 5-7 minutes.
Component Storage: Keep sushi rice and filling in separate containers in the fridge for up to 2 days before assembly to retain flavor and freshness.
What to Serve with Crispy Sushi Wonton Cones?
Imagine a vibrant spread of flavors and textures that elevate your sushi experience to the next level.
- Crispy Seaweed Salad: This refreshing salad adds a crunchy texture and a burst of umami that beautifully complements the sushi cones.
- Miso Soup: A warm, savory broth provides a soothing contrast to the crispiness of the wonton cones, enhancing the overall meal experience.
- Edamame: Lightly salted and steamed, these protein-rich beans create a delightful finger food option that pairs perfectly with the interactive concept of the cones.
- Pickled Ginger: This tangy palate cleanser sharpens the taste buds in between bites, enhancing each savory flavor in your sushi-filled delight.
- Spicy Tuna Tartare: For a luxurious touch, serve this alongside your cones; it echoes the sushi theme with a creamy, spicy kick that is irresistible.
- Cucumber-Mint Lemonade: A refreshing beverage that cleanly cuts through the richness of the avocado and tuna, leaving your palate feeling light and revitalized.
- Sesame Noodles: With a nutty undertone, these noodles offer a simple yet satisfying side that balances out the textures of the crispy cones.
- Tropical Fruit Skewers: Bright, juicy fruits add a refreshing sweetness that contrasts with the savory elements, making for a delightful dessert option.
- Sake or Sparkling Water: Elevate the experience with a glass of chilled sake or a sparkling beverage to complete your meal in style.
Creative Sushi Wonton Cones Recipe FAQs
How do I choose ripe ingredients for my Creative Sushi Wonton Cones?
Absolutely! For the best flavor, select firm, ripe avocados that yield slightly when gently pressed. They should be vibrant green with no dark spots. For tuna, ensure it’s sushi-grade, meaning it’s frozen to eliminate parasites. Look for a fresh, bright color without any strong fishy odor.
What’s the best way to store my assembled Creative Sushi Wonton Cones?
To maintain their delightful crunch, store assembled Creative Sushi Wonton Cones in an airtight container for up to 3 hours at room temperature. If you must store them longer, consider keeping the filling and components separate until just before serving, which helps the wontons stay crispy!
Can I freeze unassembled Creative Sushi Wonton Cones, and how?
Yes, you can freeze them for up to 1 month! First, wrap the un-fried wontons around your mold and place them on a baking sheet to freeze until solid. Then, transfer them to a zip-top bag, squeezing out excess air. When you’re ready, fry them directly from the freezer, adjusting the frying time to about 3-4 minutes until they’re golden brown.
What if my sushi rice is too sticky or mushy?
If your sushi rice ends up too sticky, avoid overcooking it, as this can lead to a mushy texture. Make sure to rinse the rice thoroughly before cooking to remove excess starch and cool it to room temperature to improve the texture. If it’s cooked but still too sticky, you can gently fluff it with a fork and let it cool more before assembling your cones.
Are there any dietary considerations I should keep in mind for these cones?
Definitely! If you’re serving guests with dietary restrictions, be mindful of the tuna, as some people may have seafood allergies. For a vegetarian option, substitute the tuna with tofu, roasted veggies, or even a mix of chickpeas. Also, check the labels for Kewpie mayonnaise and sauces, as they may contain allergens like soy or eggs.
How long are the components of Creative Sushi Wonton Cones good for in the fridge?
Store the sushi rice and filling separately in airtight containers in the fridge for up to 2 days before assembly. This ensures they maintain their flavor and freshness. Be sure to reheat the rice gently before using it if it’s been stored and to keep the avocado separate until assembly for the best taste and texture!

Deliciously Creative Sushi Wonton Cones for Fun Gatherings
Ingredients
Equipment
Method
- Prep Wontons: Preheat your oven to 175 °C (350 °F). Wrap each wonton around a cream horn, press and seal edges. Arrange on a baking sheet.
- Fry: Heat coconut oil in a deep skillet to 175 °C (350 °F). Fry wontons in small batches for 2-3 minutes until golden brown. Drain on paper towels.
- Prepare Sushi Rice: Cook sushi rice according to package instructions. Mix warm rice with rice vinegar, sugar, and salt. Allow to cool.
- Make Filling: Flake sushi-grade tuna and mix with Kewpie mayonnaise, ketchup, optional sriracha, and lime zest until well combined.
- Assemble: Fill cooled wonton cones with sushi rice, avocado slices, and the tuna mixture, layering ingredients for flavor.
- Garnish: Sprinkle furikake or black sesame seeds on top before serving. Enjoy immediately for the best texture.
Leave a Reply