
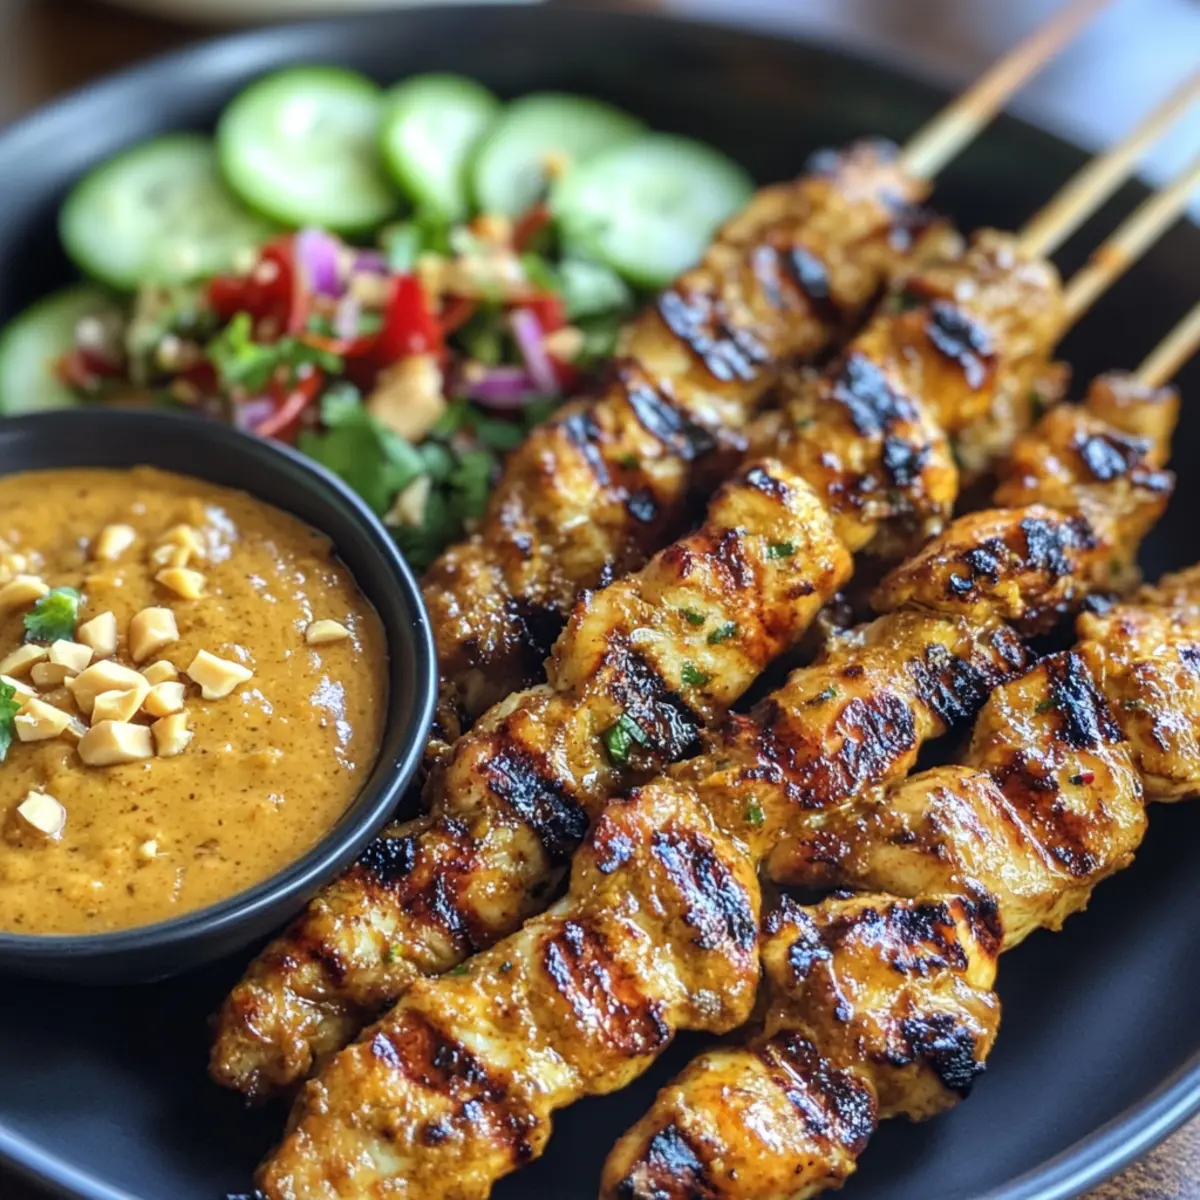
Did you know that Chicken Satay is a beloved street food staple in Thailand, adored for its comforting blend of flavors? This recipe for Delicious Chicken Satay with Peanut Sauce transforms your backyard into a vibrant Thai market, inviting friends and family to savor the juicy grilled chicken marinated in creamy coconut and aromatic curry. Not only is it easy to whip up on a weeknight, but it also doubles as a showstopper at gatherings, making it the perfect crowd-pleaser. Imagine serving these skewers alongside a zesty cucumber salad, all while crafting a delightful peanut dipping sauce that ties it all together. Ready to fire up the grill and impress your taste buds? Let’s dive in!

Why Is Chicken Satay a Must-Try?
Irresistible appeal: Chicken Satay is not just food; it’s an experience that transports you to Thailand with each bite. Quick preparation means you can indulge in this gourmet dish without spending hours in the kitchen.
Versatile options: Feel free to swap chicken for firm tofu or add colorful veggies to the skewers for a delightful twist! Looking for something to serve alongside? Pair it with a simple Thai Cucumber Salad that balances the richness of the peanut sauce.
Healthy ingredients: With coconut milk providing healthy fats and packed with protein, this recipe caters to various dietary needs without skimping on flavor. Perfect for a casual dinner or a gathering, Chicken Satay is bound to become a favorite in your kitchen!
Chicken Satay Ingredients
• Let’s get ready to create a mouthwatering Chicken Satay!
For the Chicken Marinade
- Chicken Breasts – Thinly sliced for quick cooking and to maximize flavor absorption.
- Coconut Milk – Offers creaminess and richness; can be substituted with almond milk if desired.
- Curry Powder – Provides depth; consider using garam masala for a spicier flavor profile.
- Coriander – Adds aromatic freshness; optional but can be swapped with cumin for another flavor twist.
- Sugar – Balances flavors with a touch of sweetness; try honey or agave syrup for a natural alternative.
- Salt – Essential for seasoning; adjust according to your personal taste preferences.
For the Skewers
- Wooden Skewers – Necessary for grilling; remember to soak them in water to prevent burning, or use metal skewers if you prefer.
Enjoy preparing your Chicken Satay and let those tantalizing smells fill your kitchen!
Step‑by‑Step Instructions for Chicken Satay
Step 1: Prepare the Chicken
Start by thinly slicing the chicken breasts into 1/4-inch strips, ensuring uniformity for even cooking. This helps the chicken absorb the marinade thoroughly. Lay the strips flat on a cutting board, and have your knife ready to create delicious, tender pieces for the Chicken Satay.
Step 2: Make the Marinade
In a mixing bowl, combine the creamy coconut milk, curry powder, coriander, sugar, and salt. Whisk the ingredients together until smooth, creating a luscious marinade that enhances the chicken’s natural flavor. This aromatic mixture will transform your Chicken Satay into a delightful experience, so take a moment to appreciate the lovely scent!
Step 3: Marinate the Chicken
Add the chicken strips into the marinade, ensuring they are evenly coated. It’s crucial to let the chicken marinate for at least 30 minutes—this step intensifies the flavor. Place the covered bowl in the refrigerator while the chicken soaks up the delicious flavors, preparing you for a grilling sensation later!
Step 4: Prepare the Skewers
While the chicken is marinating, soak your wooden skewers in water for about 15 minutes to prevent them from burning on the grill. If using metal skewers, you can skip this step. Once ready, gather your soaked skewers to make threading the Chicken Satay easy and ensuring a delightful presentation on the grill.
Step 5: Thread the Chicken onto Skewers
Carefully thread the marinated chicken strips onto the soaked skewers, placing 3-4 pieces per skewer. Make sure to leave a small space between each piece to allow heat circulation. This preparation showcases your Chicken Satay beautifully, ready for that perfect grill sear that will give it a mouthwatering char.
Step 6: Preheat the Grill
Preheat your grill to medium heat, around 350°F (175°C). This temperature is key to ensure the chicken cooks evenly without burning. While you wait, visualize the rich flavors of the Chicken Satay melding together—it’s almost time to indulge in this flavorful dish!
Step 7: Grill the Skewers
Once the grill is hot, place the skewers on the grates. Grill for about 5-7 minutes per side, until the chicken is cooked through and has lovely grill marks. You’ll know your Chicken Satay is ready when it reaches an internal temperature of 165°F (75°C), ensuring each bite is juicy and tender.
Step 8: Serve and Enjoy
After grilling, remove the skewers from the grill and let them rest for a few minutes. This allows juices to redistribute for maximum flavor. Serve your Chicken Satay with a side of zesty cucumber salad and a generous drizzle of peanut sauce for a fulfilling meal that transports your taste buds straight to Thailand!
What to Serve with Delicious Chicken Satay?
Indulge in the vibrant flavors of a complete meal that brings the essence of Thailand right to your dining table.
- Thai Cucumber Salad: A refreshing, zesty side that balances the richness of the satay, adding crispness and a burst of flavor to each bite.
- Jasmine Rice: Fragrant and fluffy, this rice absorbs the delightful peanut sauce, creating a fulfilling, comforting combination with the skewers.
- Coconut Rice: Creamy and subtly sweet, coconut rice enhances the tropical flavors of the chicken while adding a delightful texture.
- Grilled Veggies: Colorful mixed vegetables like bell peppers, carrots, and zucchini charred on the grill complement the chicken beautifully, adding extra nutrients.
- Peanut Sauce: A must-have dipping sauce, this creamy blend amps up the flavor experience and makes each skewer irresistible.
- Chili Sauce: For spice enthusiasts, a drizzle of chili sauce adds a warming kick, elevating the dish’s flavor profile to new heights.
- Thai Iced Tea: Cool and creamy, this sweet beverage contrasts perfectly with the savory satay, providing a refreshing respite after each bite.
- Fruit Salad: A light, tropical fruit salad with mango and pineapple serves as a sweet finish, cleansing your palate beautifully after the savory meal.
- Lemonade: A zesty lemonade is a great way to quench your thirst, complementing the warm spices of the chicken with its tart and sweet flavors.
Tips for the Best Chicken Satay
-
Uniform Cuts Matter: Ensure chicken strips are uniformly cut for even cooking. This prevents some pieces from being overcooked while others remain underdone—essential for delicious Chicken Satay.
-
Marination Time: Don’t rush the marination process! Allow at least 30 minutes for the flavors to penetrate the chicken fully. For deeper flavors, marinate overnight.
-
Soak Wooden Skewers: Always soak wooden skewers in water for at least 15 minutes before using them. This crucial step prevents burning and lets your Chicken Satay shine on the grill.
-
Grill Temperature Check: Preheat your grill to medium heat. A consistent temperature avoids charring the exterior while ensuring the chicken cooks through.
-
Rest Before Serving: After grilling, let your skewers rest for a few minutes. This lets the juices redistribute, making every bite of Chicken Satay tender and juicy.
Make Ahead Options
These Chicken Satay skewers are a fantastic choice for meal prep enthusiasts! You can marinate the chicken strips up to 24 hours in advance, allowing them to absorb all those delicious flavors for a deeper taste. Additionally, once cooked, the Chicken Satay can be stored in the refrigerator for up to 3 days. Just make sure to place the cooked skewers in an airtight container to maintain their juicy texture. When you’re ready to serve, simply reheat them on the grill or in the oven for a few minutes until warmed through. This way, you can enjoy a restaurant-quality meal without the fuss after a busy day!
How to Store and Freeze Chicken Satay
Fridge: Store cooked Chicken Satay in an airtight container for up to 3 days. This keeps your skewers fresh and ready to enjoy throughout the week.
Freezer: For longer storage, freeze cooked Chicken Satay in a freezer-safe container for up to 3 months. Allow it to cool completely before freezing to preserve texture.
Reheating: To reheat, either grill again for a few minutes or microwave on high until heated through. Add a splash of water or a little coconut milk to keep it moist!
Marinating in Advance: You can marinate the chicken a day ahead for enhanced flavors. Just be sure to refrigerate it until you’re ready to grill!
Chicken Satay Variations & Substitutions
Feel free to get creative with this Chicken Satay recipe and make it your own in delicious ways!
- Vegetarian Option: Swap chicken for firm tofu; marinate as usual for a protein-packed, plant-based delight.
- Spicy Kick: Add a tablespoon of chili paste to your marinade for extra heat that ignites your palate.
- Colorful Veg Skewers: Thread bell peppers, zucchini, or even mushrooms onto your skewers; they complement the chicken beautifully!
- Nut-Free: Replace peanut sauce with sunflower seed butter for those with nut allergies; it provides a uniquely nutty flavor.
- Garam Masala Twist: Use garam masala instead of curry powder for a different flavor profile, offering a warm spice blend.
- Coconut Milk Alternative: Almond milk can be used in place of coconut milk for a lower-calorie version while still keeping it creamy.
- Sweeten Naturally: Instead of sugar, try maple syrup or a splash of orange juice to naturally sweeten your marinade.
- Garnish Variety: Top your Chicken Satay with fresh herbs like cilantro or mint for a vibrant finish—texture and flavor come alive!
Enjoy pairing these variations with side dishes like a refreshing Thai Cucumber Salad or a hearty, comforting bowl of Anti Inflammatory Chicken Soup to complete your meal!

Chicken Satay Recipe FAQs
How do I choose ripe chicken breasts?
Absolutely! When selecting chicken breasts, look for a fresh pink color and firm texture. Avoid any that appear discolored or have a slimy texture. Fresh chicken should also have no unpleasant odor.
How do I store leftover Chicken Satay?
Very simple! Place cooked Chicken Satay in an airtight container and store it in the fridge for up to 3 days. This keeps your skewers fresh and ready for quick meals or snacks throughout the week!
Can I freeze Chicken Satay?
Yes, you can! For freezing, make sure the cooked Chicken Satay has completely cooled. Then, place it in a freezer-safe container or resealable freezer bag, removing as much air as possible. It can be frozen for up to 3 months. Label the bag with the date for reference!
What should I do if my Chicken Satay is dry?
If your Chicken Satay turns out dry, it may have been overcooked. To remedy this, serve it with extra peanut sauce for added moisture. Alternatively, soak it in a mixture of coconut milk and a little warm water for a more tender result. When grilling, ensure internal temperatures reach 165°F (75°C) for perfect juiciness!
Are there any dietary concerns with Chicken Satay?
Chicken Satay can be customized for various dietary needs. If you’re concerned about allergies, you can substitute the peanut sauce with sunflower seed butter or tahini for nut-free options. For vegetarians, firm tofu makes a fantastic substitute for chicken! Always check labels on your ingredients for specific allergens.
How long should I marinate Chicken Satay for best flavor?
I recommend marinating the chicken for at least 30 minutes, but if you have the time, marinating overnight will significantly enhance the flavor! Just make sure to store it in the refrigerator while marinating to keep it safe and fresh. Enjoy your flavorful Chicken Satay!

Mouthwatering Chicken Satay with Creamy Peanut Sauce Recipe
Ingredients
Equipment
Method
- Thinly slice the chicken breasts into 1/4-inch strips.
- Combine coconut milk, curry powder, coriander, sugar, and salt in a mixing bowl, whisking until smooth.
- Add chicken strips to the marinade, ensuring they are well coated. Cover and refrigerate for at least 30 minutes.
- Soak your wooden skewers in water for about 15 minutes.
- Thread the marinated chicken onto the soaked skewers, placing 3-4 pieces per skewer.
- Preheat the grill to medium heat (350°F or 175°C).
- Grill the skewers for 5-7 minutes per side until the chicken is cooked through and has grill marks.
- Remove from the grill and let the skewers rest for a few minutes before serving.
Leave a Reply