
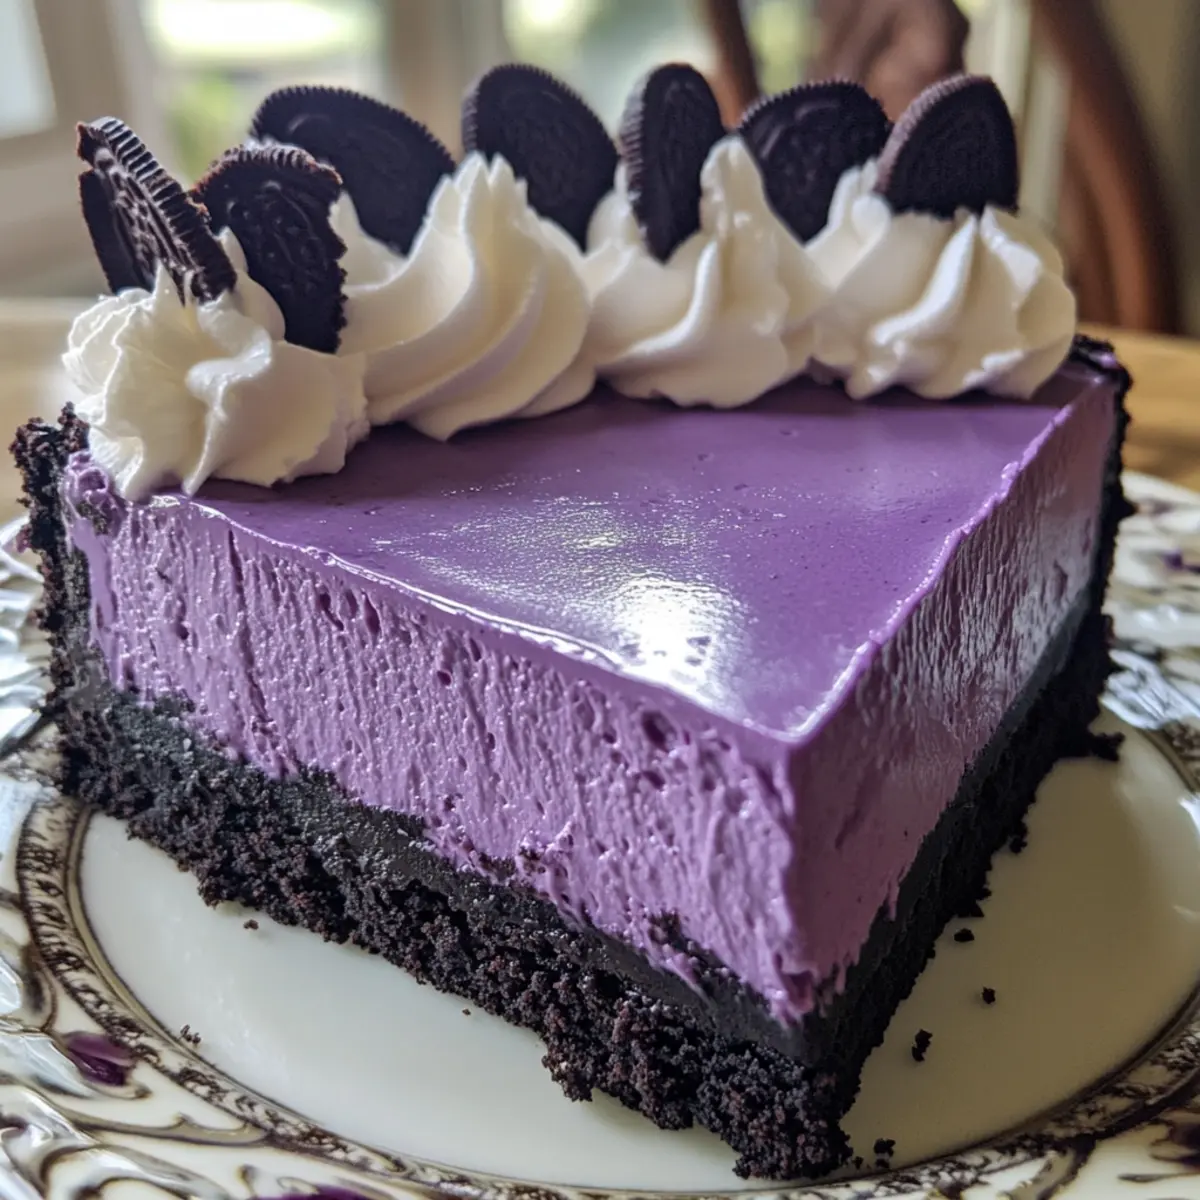
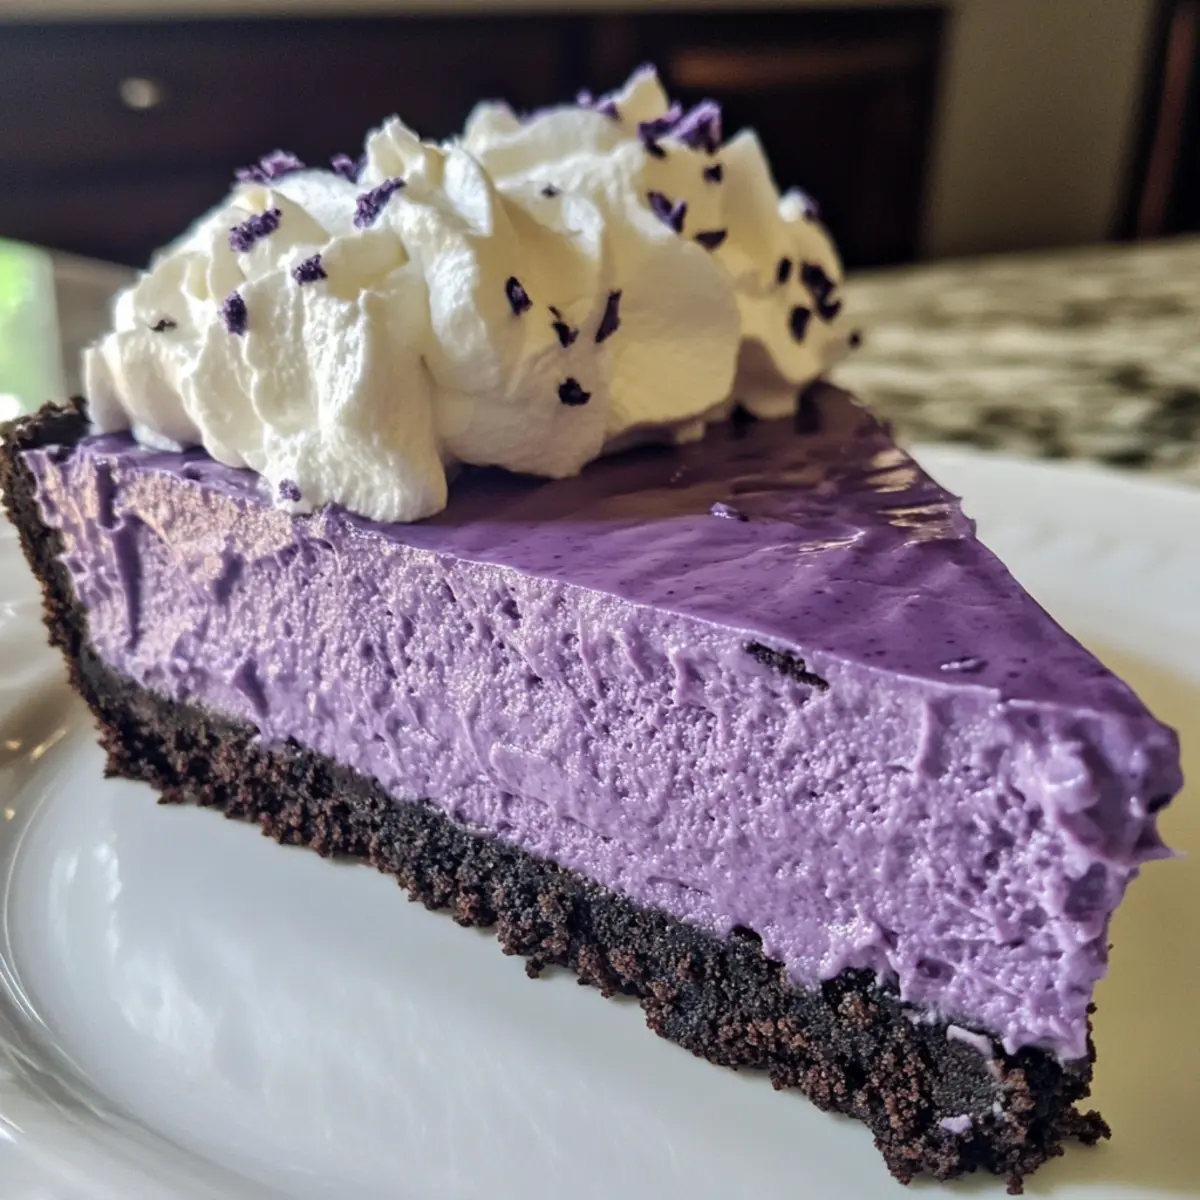
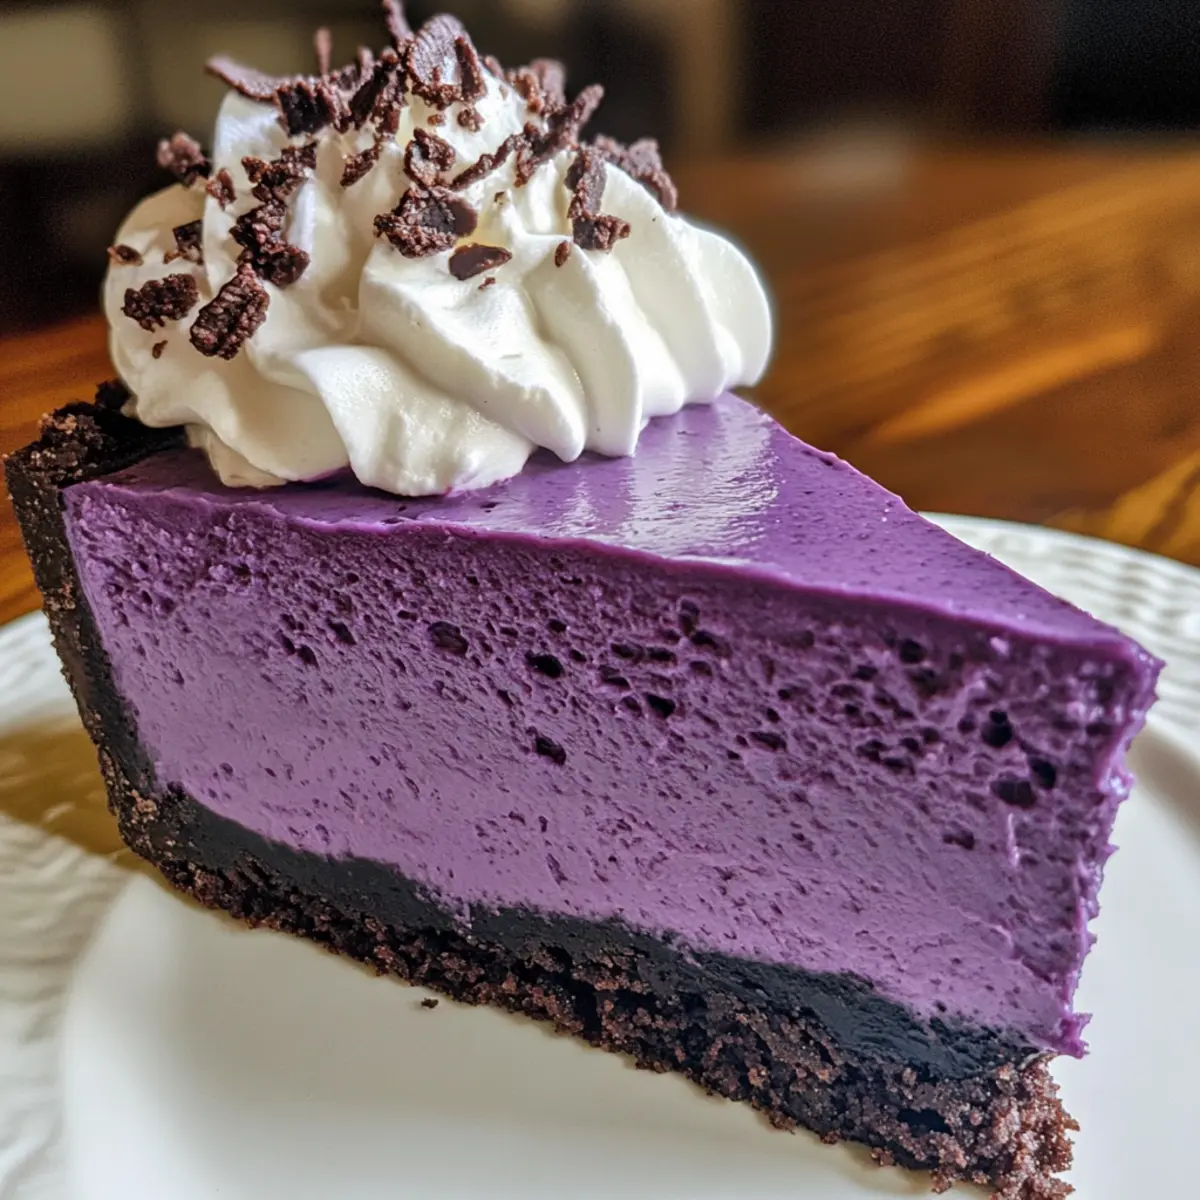
While flipping through my favorite dessert cookbooks, I stumbled upon a vibrant purple yam staring back at me—ube, that charming little powerhouse of flavor. The moment I remixed it into a rich Ube Cheesecake with Oreo Crust, I knew I had struck gold. This luscious treat not only champions the unique nutty sweetness of ube but also gives a delightful crunch thanks to the Oreo base. It’s quick to whip up and an absolute showstopper, perfect for any gathering or a cozy night in. What’s not to love about a creamy fusion dessert that brightens up your table and delights the senses? Curious to discover how to create this delicious treasure? Let’s dive in!
Why is Ube Cheesecake a Must-Try?
Creamy Delight: This Ube Cheesecake offers a smooth texture that melts in your mouth, perfectly complemented by a crunchy Oreo crust.
Vibrant Presentation: Its striking purple hue transforms any dessert table into an eye-catching display, sure to impress your guests.
Unique Flavor Fusion: The nuttiness of ube paired with the sweetness of Oreos creates an unforgettable flavor experience.
Quick and Easy: Simple enough for beginners yet impressive enough for seasoned chefs, this recipe strikes the perfect balance between ease and elegance.
Versatile Dessert: Whether it’s for a birthday party or a cozy family dinner, this cheesecake adapts beautifully to any occasion.
Don’t forget to check out my Pumpkin Cheesecake Muffins or Carrot Cake Cheesecake for more delightful desserts!
Ube Cheesecake with Oreo Crust Ingredients
For the Crust
• Oreo Cookies – Perfect base for a crunchy texture; substitute with gluten-free cookies if needed.
• Melted Butter – Binds the Oreo crumbs; use coconut oil for a dairy-free option.
For the Cheesecake Filling
• Cream Cheese – Ensures a creamy and luscious texture; make sure it’s softened for easy blending.
• Sugar – Sweetens the cheesecake; can substitute with coconut sugar for a healthier twist.
• Sour Cream – Adds a hint of tanginess and moisture; Greek yogurt can be a great alternative.
• Ube Halaya (Purple Yam Jam) – Brings distinct nutty sweetness and vibrant color; can use store-bought or homemade.
• Ube Extract – Boosts the ube flavor; it’s optional but highly recommended for a deeper taste.
• Salt – Balances sweetness and enhances all the flavors.
• Eggs – Key for setting the cheesecake; remember to add them one at a time for a smooth mix.
Optional Topping
• Coconut Whipped Cream – Adds a light, fluffy finish and pairs beautifully with the ube flavor; try homemade or store-bought.
Now that you have all the ingredients ready, let’s move on to creating this luscious Ube Cheesecake with Oreo Crust!
Step‑by‑Step Instructions for Ube Cheesecake with Oreo Crust
Step 1: Preheat Your Oven
Begin by preheating your oven to 325°F (163°C). This ensures that your Ube Cheesecake with Oreo Crust bakes evenly. While the oven heats up, gather your ingredients and equipment, placing them on a clean work surface for easy access.
Step 2: Prepare the Oreo Crust
Separate the cream filling from the Oreo cookies and crush the cookies in a plastic bag using a rolling pin until they form fine crumbs. This will create a crunchy base for your cheesecake. In a mixing bowl, combine the crushed Oreos with melted butter until fully blended, creating a damp mixture.
Step 3: Form the Crust
Prepare a 9-inch springform pan by lining the bottom with parchment paper and greasing the sides with a little melted butter. Press the Oreo mixture firmly into the bottom of the pan to create an even layer, ensuring it’s compact. Bake the crust in the preheated oven for 10 minutes, and let it cool slightly afterward.
Step 4: Mix the Cheesecake Filling
In a large mixing bowl, beat the softened cream cheese with an electric mixer on medium speed until smooth and creamy. Gradually add in the sugar, sour cream, ube halaya, ube extract, and salt, mixing until all ingredients are fully incorporated for your luscious Ube Cheesecake filling.
Step 5: Incorporate the Eggs
Add the eggs one at a time to the cream cheese mixture, blending well after each addition to ensure a smooth batter. Be cautious not to overmix; you want a creamy consistency without incorporating too much air, which can lead to cracks during baking.
Step 6: Combine Batter and Crust
Pour the creamy cheesecake batter over your cooled Oreo crust, spreading it evenly with a spatula. This is where the magic happens! To prevent water from the baking bath seeping into the cake, wrap the bottom of the springform pan in aluminum foil, ensuring a tight seal.
Step 7: Prepare the Water Bath
Place your wrapped springform pan into a larger roasting pan. Carefully fill the roasting pan with hot water until it reaches about halfway up the sides of the springform pan. This water bath will create a moist baking environment, keeping the Ube Cheesecake from cracking.
Step 8: Bake the Cheesecake
Bake the Ube Cheesecake in the preheated oven for 60-70 minutes. It should be slightly jiggly in the center but firm around the edges when done. Once baked, turn off the oven and let the cheesecake cool in the oven with the door ajar for 10-15 minutes to help prevent cracks.
Step 9: Chill and Set
After allowing it to cool, remove the cheesecake from the oven and let it cool completely at room temperature. Once cooled, cover the cheesecake and chill it in the refrigerator for at least 6 hours, or even better, overnight. This step is crucial for developing the flavors and achieving the ideal texture.
Step 10: Serve and Enjoy
When ready to serve, carefully remove the sides of the springform pan. Slice the Ube Cheesecake and top each slice with a generous dollop of coconut whipped cream for an extra layer of deliciousness. Enjoy this creamy fusion dessert as a delightful centerpiece at your next gathering!
Ube Cheesecake with Oreo Crust Variations
Feel free to get creative with this Ube Cheesecake recipe and make it uniquely yours!
- Dairy-Free: Substitute cream cheese with a dairy-free alternative and use coconut whipped cream for a luscious finish.
- Gluten-Free: Swap Oreo cookies with gluten-free chocolate cookies for a delightful gluten-free crust.
- Extra Flavor: Mix in some vanilla extract with the cheesecake batter for a warm, aromatic touch that complements the ube.
- Swirled Delight: Before baking, swirl extra ube halaya into the cheesecake batter for a more colorful and flavorful design.
- Nutty Twist: Top the cheesecake with toasted coconut flakes or crushed nuts for an added texture and nutty flavor.
- Fruit Topping: Use fresh fruit like mango or berries for a vibrant and refreshing topping that contrasts beautifully with the rich cheesecake.
- Layered Effect: Create a multi-layered cheesecake by baking a layer of plain cheesecake first, followed by the ube layer for a stunning visual!
- Chocolate Touch: Drizzle melted chocolate over the top before serving for an indulgent twist that chocolate lovers will adore.
Don’t forget to check out my Pumpkin Cheesecake Muffins and Carrot Cake Cheesecake for even more delicious inspirations!
Expert Tips for the Best Ube Cheesecake
-
Room Temperature Cream Cheese: Ensure your cream cheese is at room temperature to avoid lumps, resulting in a smooth and creamy cheesecake filling.
-
Water Bath Magic: Using a water bath is key to prevent cracks and keep the Ube Cheesecake from drying out. It provides gentle, even heat during baking.
-
Chill for Perfection: Allow the cheesecake to chill overnight in the refrigerator. This step enhances flavor and ensures a firm, luscious texture, making every bite divine.
-
Eggs Matter: Add eggs one at a time and mix just until combined. Overmixing can incorporate air, leading to cracks when baking.
-
Keep an Eye on Time: Watch the baking time closely; the cheesecake should be slightly jiggly in the center but set around the edges for the perfect finish.
-
Optional Top Layer: For a more intense ube flavor, consider adding a thin layer of ube halaya on top of the cheesecake before adding whipped cream.
What to Serve with Ube Cheesecake with Oreo Crust
Elevate your dessert experience by pairing this delightful cheesecake with complementary flavors that enhance its creamy richness and unforgettable taste.
-
Fresh Berries: Juicy strawberries and blueberries provide a bright contrast, adding a burst of freshness that balances the sweetness of the cheesecake.
-
Coconut Sorbet: This light, refreshing sorbet mirrors the coconut whipped cream topping, creating a harmonious blend of tropical flavors.
-
Whipped Cream: A classic accompaniment, a light dollop of vanilla or coconut whipped cream adds an extra layer of creaminess and complements the ube wonderfully.
-
Matcha Green Tea: The earthy notes of matcha offer a unique twist, balancing the cheesecake’s sweetness with soothing, herbal undertones.
-
Coffee: A rich brew or an espresso enhances the flavor profile, cutting through the creaminess with a bold contrast that pleases the palate.
-
Mini Fruit Tarts: These bite-sized pastries provide a beautiful array of fresh fruit, adding vibrant colors and more textures to your dessert table.
-
Chocolate Covered Almonds: The crunch of these nuts accented with rich chocolate pairs magnificently with the cheesecake, adding a delightful texture and flavor element.
-
Chilled Bubble Tea: This fun, chewy drink adds an interactive element to dessert time while its sweetness complements the ube cheesecake’s creamy finish.
-
Coconut Macaroons: These chewy treats are a delicious nod to the coconut flavors in both the cheesecake and the toppings, creating a cohesive dessert experience.
Serve these delightful companions alongside your Ube Cheesecake for a feast that tantalizes every sense!
How to Store and Freeze Ube Cheesecake with Oreo Crust
Fridge: Keep any leftover Ube Cheesecake covered in an airtight container for up to 1 week. This preserves its creamy texture and delightful flavors.
Freezer: For longer storage, you can freeze slices of the cheesecake. Wrap them tightly in plastic wrap followed by aluminum foil, and they can last up to 3 months in the freezer.
Thawing: When ready to enjoy, transfer the frozen cheesecake to the fridge and let it thaw overnight. This slow method keeps the texture smooth and delicious.
Reheating: This cheesecake is best served chilled, so there’s no need for reheating. Just add a dollop of coconut whipped cream before serving for an extra touch!
Make Ahead Options
These Ube Cheesecake with Oreo Crust are perfect for busy home cooks looking to save time while still impressing guests! You can prepare the crust and filling separately up to 24 hours in advance. For the crust, simply crush the Oreos and mix them with melted butter, then press into the pan and refrigerate. For the filling, mix the cream cheese, sugar, ube halaya, and other ingredients, and store covered in the fridge. When ready to bake, pour the chilled filling over the crust and follow the remaining steps. This method ensures your cheesecake maintains its creamy texture while providing the convenience of pre-preparation for any occasion!
Ube Cheesecake with Oreo Crust Recipe FAQs
What type of ube should I use for the cheesecake?
You can use either store-bought ube halaya (purple yam jam) or homemade. If you make it at home, ensure that it has a creamy consistency, as this will integrate smoothly into your cheesecake filling. The nutty sweetness of ube is key to achieving that unique flavor.
How should I store leftover Ube Cheesecake?
Store any leftover Ube Cheesecake covered in an airtight container in the refrigerator for up to 1 week. This helps retain its creamy texture and ensures that every bite remains delightful.
Can I freeze Ube Cheesecake?
Absolutely! To freeze, wrap individual slices tightly in plastic wrap and aluminum foil. You can also freeze the whole cheesecake by wrapping it this way and it will last up to 3 months. When you’re ready to eat, simply transfer it to the fridge and let it thaw overnight for the best texture.
Why does my cheesecake have cracks?
Cracks are often caused by overmixing the batter or baking at too high a temperature. To prevent this, mix the eggs one at a time and avoid overmixing after each addition. Using a water bath during baking also provides gentle, even heat to minimize cracking.
Can I make this cheesecake dairy-free?
Yes! You can substitute the cream cheese with a dairy-free cream cheese alternative and the melted butter can be swapped for coconut oil. Just be sure to use dairy-free whipped cream for the topping if you want to keep it completely dairy-free.
Is Ube Cheesecake safe for pets?
While ube is not toxic to pets, it’s best to avoid giving any cheesecake to pets due to the sugar and dairy content. Always consult with your veterinarian before sharing human food with your furry friends to ensure their safety.
Creamy Ube Cheesecake with Oreo Crust: A Sweet Escape
Ingredients
Equipment
Method
- Preheat your oven to 325°F (163°C). Gather your ingredients and equipment.
- Separate the cream filling from the Oreo cookies and crush until fine crumbs. Mix with melted butter.
- Prepare a 9-inch springform pan. Press the Oreo mixture into the bottom to create an even layer. Bake for 10 minutes and let cool.
- In a bowl, beat cream cheese until smooth. Gradually mix in sugar, sour cream, ube halaya, ube extract, and salt.
- Add the eggs one at a time, mixing well after each addition until smooth.
- Pour the cheesecake batter over the cooled crust, spreading evenly. Wrap the bottom of the pan in aluminum foil.
- Place the wrapped pan into a larger roasting pan. Fill with hot water halfway up the sides.
- Bake for 60-70 minutes. Let cool in the oven with the door ajar for 10-15 minutes.
- Remove from the oven and chill in the refrigerator for at least 6 hours or overnight.
- Remove from springform, slice, and top with whipped cream when ready to serve.
Leave a Reply