
As I unwrapped the Nilla Wafers, their sweet aroma wafted through the kitchen, taking me back to lazy summer afternoons spent indulging in banana pudding. This Creamy Banana Pudding Cheesecake transforms that nostalgic dessert into a luscious delight that’s sure to steal the spotlight at any gathering. With its rich, dreamy texture and crunchy crust, it’s the perfect blend of comfort and elegance. Plus, it’s a breeze to make, so you can impress your friends and family without spending hours in the kitchen. Whether it’s a cozy family dinner or a festive celebration, this dessert brings the flavors of classic banana pudding to life in a whole new, exciting way. Are you ready to create a slice of happiness that your loved ones will be raving about?

Why is this Cheesecake So Irresistible?
Decadent Fusion: This Creamy Banana Pudding Cheesecake melds the beloved tastes of banana pudding and cheesecake into a single slice of heaven.
Crunchy Bliss: The Nilla Wafer crust offers a delightful crunch that perfectly balances the velvety filling.
Easy Preparation: You can whip up this dessert with minimal effort! It’s perfect for those who love homemade treats without the hassle.
Crowd-Pleasing Dessert: Bring it to gatherings, and watch as it disappears, earning you rave reviews alongside other favorites like Pumpkin Cheesecake Muffins and Carrot Cake Cheesecake.
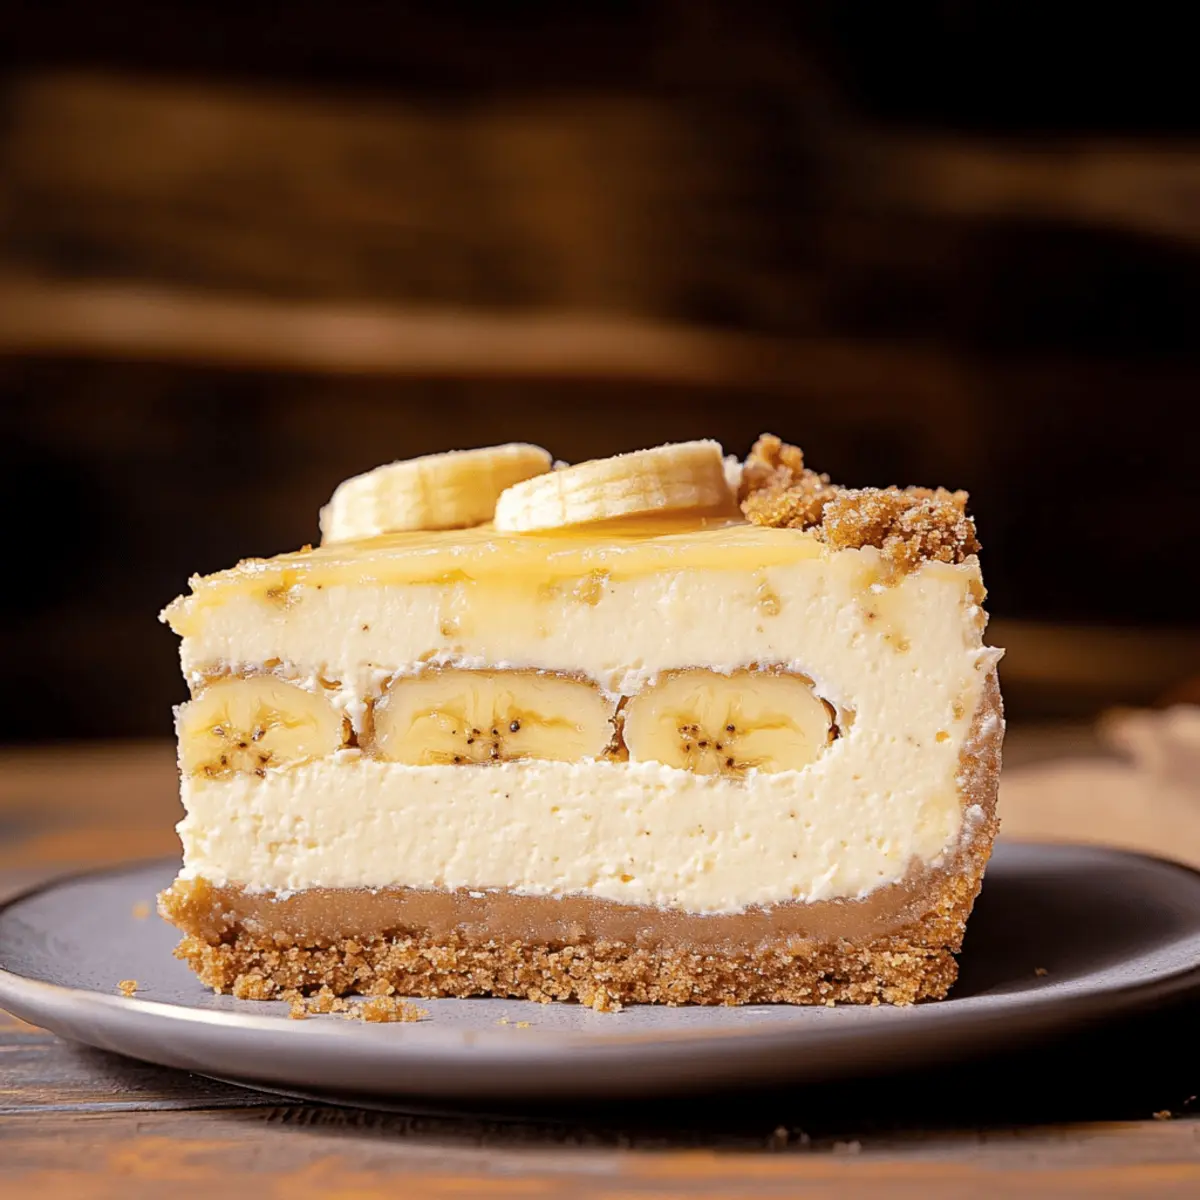
Layered Indulgence: Each bite reveals soft, sweet banana layers topped with a fluffy vanilla pudding that adds a dreamy finish. You won’t just enjoy it; you’ll want to savor every last morsel!
Banana Pudding Cheesecake Ingredients
Get ready to gather the key ingredients for your Creamy Banana Pudding Cheesecake that will make your kitchen feel like a bakery!
For the Crust
- Nilla Wafers – A sweet and crunchy base that perfectly complements the creamy filling; feel free to swap in Graham crackers for a different flavor.
- Brown Sugar – Adds depth of sweetness; use light or dark sugar interchangeably depending on your preference.
- Unsalted Butter – Binds your crust ingredients together; margarine can work as a substitute if needed.
For the Creamy Filling
- Cream Cheese – The heart of your cheesecake; use full-fat for a rich texture, as low-fat may compromise the creaminess.
- White Granulated Sugar – Provides just the right amount of sweetness; granulated erythritol can make this a sugar-free option.
- Pure Vanilla Extract – Enhances the overall flavor; vanilla bean paste offers a more intense aroma if you desire.
- Bananas (mashed) – Naturally sweetens the filling; ripe bananas yield the best flavor.
- Sour Cream – Contributes tanginess and creaminess; Greek yogurt makes a great alternative.
- Heavy Cream – Adds richness, with coconut cream as a dairy-free substitute option.
- Large Eggs – Essential for structure and to help the cheesecake set.
For the Layers
- Crushed Nilla Wafers – Provides a fun texture between layers; digestive biscuits can also be used for diversity.
- Bananas (sliced thinly) – Used for layering to amplify banana flavor in each slice.
- Instant Vanilla Pudding – Creates the luscious pudding layer; avoid cook-and-serve varieties for best results.
- Milk – Necessary for the pudding layer; non-dairy milk can work, but check for the right consistency.
- Additional Heavy Cream – For whipping into peaks to crown your cheesecake beautifully.
- Crushed Nilla Wafers (for decorating) – Optional for a lovely, decorative touch on top.
With these Banana Pudding Cheesecake ingredients, you’re just a few steps away from creating a dessert that will have everyone asking for seconds!
Step‑by‑Step Instructions for Banana Pudding Cheesecake
Step 1: Preheat and Prepare Your Pan
Begin by preheating your oven to 325°F (163°C). While the oven heats, take a 9-inch springform pan and lightly grease the sides with butter or cooking spray. This will help the cheesecake release easily once it’s baked. For extra assurance, consider lining the bottom with parchment paper.
Step 2: Make the Nilla Wafer Crust
In a medium bowl, combine crushed Nilla Wafers, brown sugar, and melted butter. Mix until the crumbs are well-coated and resemble wet sand. Press this mixture firmly into the bottom of the prepared pan to create an even layer. Bake the crust for 11 minutes until it’s lightly golden and fragrant, then allow it to cool while you prepare the filling.
Step 3: Prepare the Creamy Cheesecake Filling
In a large mixing bowl, beat the cream cheese and granulated sugar using an electric mixer until creamy and smooth, about 2-3 minutes. Add the mashed bananas, vanilla extract, sour cream, and heavy cream, mixing on low speed until combined. This creamy mixture will become the heart of your banana pudding cheesecake, so make sure it’s well-blended.
Step 4: Incorporate the Eggs
Next, add in the eggs one at a time, mixing gently after each addition until just combined. Avoid over-mixing to keep your cheesecake light and fluffy. The filling should have a smooth consistency without any lumps for the best texture in your Banana Pudding Cheesecake.
Step 5: Layer the Cheesecake
Pour half of the creamy filling over the cooled Nilla Wafer crust, spreading it evenly. Next, add a layer of thinly sliced bananas and sprinkle crushed Nilla Wafers over them for added texture. Finish by pouring the remaining cheesecake batter on top, ensuring it fully covers the layers beneath.
Step 6: Bake the Cheesecake
Prepare a water bath by placing your springform pan into a larger baking dish and filling it with hot water until it reaches halfway up the sides of the pan. Bake your cheesecake in the preheated oven for 80-90 minutes until set but slightly jiggly in the center. This gentle baking method will help prevent cracks and ensure a creamy texture.
Step 7: Cool Gradually
Once baked, turn off the oven and crack the door open slightly. Let the cheesecake cool in the oven for about 30 minutes, which will help prevent sudden temperature changes that could cause cracking. After this, move it to the countertop to cool to room temperature, then refrigerate it for at least 6 hours or preferably overnight.
Step 8: Prepare the Whipped Vanilla Pudding
While your cheesecake is chilling, mix the instant vanilla pudding powder with the milk in a separate bowl, whisking until thickened. After this, gently fold in whipped heavy cream until the mixture is light and fluffy, creating a delicious, airy topping for your Banana Pudding Cheesecake.
Step 9: Assemble and Garnish
Once your cheesecake has chilled completely and set, remove it from the springform pan. Spread the whipped vanilla pudding evenly over the top. For a decorative touch, sprinkle crushed Nilla Wafers on top before serving. This added layer will elevate your cheesecake’s presentation and enhance its crunch.

What to Serve with Creamy Banana Pudding Cheesecake
As you savor each luscious slice of this delightful dessert, discover the perfect accompaniments that elevate your dining experience.
- Fresh Berries: The tartness of strawberries or blueberries contrasts beautifully with the creamy sweetness, adding vibrant colors and a refreshing taste.
- Whipped Cream: A dollop of lightly sweetened whipped cream enhances the cheesecake’s richness, providing an airy texture in every bite.
- Chocolate Sauce: Drizzling warm chocolate sauce over a slice introduces a dreamy chocolate flavor that perfectly complements the bananas. The rich and sweet notes work together to create a decadent dessert experience.
- Caramel Sauce: A drizzle of caramel adds a deliciously gooey finish, enhancing the banana flavor and creating a harmonious blend of sweetness. It marries the creamy filling with the crunchy crust beautifully.
- Coffee or Espresso: A strong cup of coffee balances the dessert’s sweetness, making for a classic pairing that awakens the palate. The bitter notes cut through the creaminess, creating a delightful contrast.
- Ice Cream: Vanilla or banana-flavored ice cream offers a cool, creamy addition that elevates the whole dessert experience, making it even more indulgent. A scoop brings extra joy to every serving, and it melts deliciously over warm slices.
- Chocolate Chip Cookies: Serve a side of freshly baked chocolate chip cookies for a nostalgic pairing that echoes childhood favorites and makes for a sweet encore.
- Mint Leaves: Fresh mint leaves not only brighten up the plate but also provide a subtle touch of freshness that contrasts with the rich flavors of the cheesecake.
These pairings will enhance your Creamy Banana Pudding Cheesecake, making it a truly unforgettable treat for any gathering.
How to Store and Freeze Banana Pudding Cheesecake
Fridge: Store your Banana Pudding Cheesecake covered in the refrigerator for up to 5 days. Make sure to use a cake dome or plastic wrap to prevent it from absorbing other odors.
Freezer: If you’d like to enjoy your cheesecake later, freeze individual slices by wrapping them tightly in plastic wrap, then aluminum foil. They can last up to 3 months in the freezer without losing flavor.
Thawing: To enjoy frozen slices, transfer them to the fridge for several hours or overnight to thaw gently. Avoid microwaving, as it can affect the creamy texture.
Serving After Storage: For the best experience, serve chilled. Fresh banana slices can be added just before serving to enhance the dessert’s appeal.
Make Ahead Options
These Creamy Banana Pudding Cheesecakes are perfect for busy home cooks who want to save time while still impressing their guests! You can prepare the Nilla Wafer crust up to 3 days in advance by simply wrapping it tightly in plastic wrap and refrigerating it. Additionally, the cheesecake filling can be made and refrigerated separately up to 24 hours before baking, ensuring that everything stays fresh and delicious. When you’re ready to serve, just bake the cheesecake according to the instructions, cool, and top it with the whipped vanilla pudding. By prepping ahead, you’ll have a delightful dessert waiting for you with minimal effort, allowing you to enjoy all the sweet moments with your loved ones!
Expert Tips for Banana Pudding Cheesecake
Room Temperature Dairy: Ensure all dairy ingredients are at room temperature for the best mixing and creaminess in your Banana Pudding Cheesecake.
Avoid Cracking: Use a water bath when baking to prevent cracks. Wrap the springform pan in foil to avoid water leaks.
Chill Overnight: For optimal flavor and texture, chill the cheesecake overnight. It enhances the creamy consistency and allows flavors to meld beautifully.
Quality Bananas: Use ripe bananas for the filling; they provide richer flavor and natural sweetness. Overripe bananas won’t hurt, but aim for those just past the green stage.
Handle with Care: Let the cheesecake cool gradually in the oven to prevent it from sinking. A sudden temperature change can affect its texture negatively.
Banana Pudding Cheesecake Variations
Feel free to mix things up with these delightful twists that invite your creativity to shine!
- Graham Cracker Crust: Swap Nilla Wafers for Graham crackers for a different texture and flavor that’s still deliciously sweet.
- Chocolate Lovers: Add cocoa powder to the pudding layer or use chocolate wafers for a decadent chocolate banana fusion. It’s an unexpected, delightful twist that chocolate fans will adore!
- Nutty Crunch: Fold in crushed nuts like pecans or walnuts into the crust or pudding layer for an added crunch that complements the creamy filling beautifully.
- Flavorful Cream Cheese: Experiment with flavored cream cheese, such as banana or hazelnut, for an extra kick of taste. These variations can elevate the cheesecake to a new level of indulgence!
- Caramel Swirl: Drizzle caramel sauce into the filling or on top for an added layer of sweetness and a touch of decadence. Paired with the banana flavors, it becomes a luxurious dessert!
- Dairy-Free Delight: Substitute coconut cream for heavy cream and use non-dairy milk to make this cheesecake dairy-free while retaining that luscious creaminess.
- Banana Pudding Cheesecake Parfaits: Layer the ingredients in jars instead of a cheesecake for a fun, individual serving option. These parfaits are perfect for parties or gatherings!
- Add Heat: Incorporate a pinch of cayenne pepper or chili powder in the pudding layer for an unexpected, delightful kick that will truly surprise your guests.
Once you’ve explored these variations, don’t forget to check out the Strawberry Crunch Cheesecake for another show-stopping dessert idea! Each variation opens up a world of flavors that can take your Banana Pudding Cheesecake to new heights. Enjoy your baking adventure!

Banana Pudding Cheesecake Recipe FAQs
What kind of bananas should I use for the cheesecake?
Absolutely! For the best flavor and sweetness, you should use ripe bananas. Look for bananas that are slightly speckled but still firm, as these provide natural sweetness without being excessively mushy. Overripe bananas can work too, but aim for those that are just starting to yellow for that perfect creamy texture.
How should I store the Banana Pudding Cheesecake?
You can store your Banana Pudding Cheesecake covered in the refrigerator for up to 5 days. It’s best to use a cake dome or wrap it well in plastic wrap to prevent it from absorbing other odors in your fridge.
Can I freeze the Banana Pudding Cheesecake?
Absolutely! To freeze your cheesecake, slice it into individual portions and wrap each slice tightly in plastic wrap, then in aluminum foil. This way, they can last up to 3 months in the freezer without losing that luscious flavor. When you’re ready to enjoy, transfer the slices to the fridge to thaw gently overnight.
Why did my cheesecake crack during baking?
Don’t worry; this can happen to the best of us! To avoid cracks, always bake your cheesecake in a water bath. This gentle heat helps ensure even cooking. Also, make sure to avoid over-mixing the filling. Cracks can also result from temperature changes, so once baked, let your cheesecake cool gradually in the oven with the door slightly ajar for about 30 minutes.
Can I make any substitutions for the ingredients?
Very! If you’re looking for substitutes, you can use Greek yogurt in place of sour cream for a tangy flavor. For a dairy-free option, consider coconut cream instead of heavy cream. You could even use crushed Oreos for the crust if you’re feeling adventurous! The more the merrier with variations!
Creamy Banana Pudding Cheesecake You'll Dream About
Ingredients
Equipment
Method
- Preheat your oven to 325°F (163°C). Grease a 9-inch springform pan and optionally line the bottom with parchment paper.
- Combine crushed Nilla Wafers, brown sugar, and melted butter in a bowl until coated. Press into the pan and bake for 11 minutes. Allow to cool.
- Beat cream cheese and sugar until creamy. Add bananas, vanilla, sour cream, and heavy cream; mix until combined.
- Incorporate eggs one at a time, mixing gently after each addition.
- Pour half of the filling into the crust, add sliced bananas and crushed Nilla Wafers, then top with remaining filling.
- Place the springform in a larger baking dish filled with hot water, bake for 80-90 minutes until set but jiggly.
- Turn off the oven and let cool inside for 30 minutes. Move to room temperature, then refrigerate for at least 6 hours.
- Mix instant pudding powder with milk until thick, then fold in whipped cream.
- Once chilled, spread the pudding over the cheesecake and sprinkle with crushed Nilla Wafers before serving.
Leave a Reply